How to Wet-Mold and Shape Leather
Learn how to wet mold leather to create 3D shapes. A beginner's guide to wetting, forming, and drying leather over molds safely.
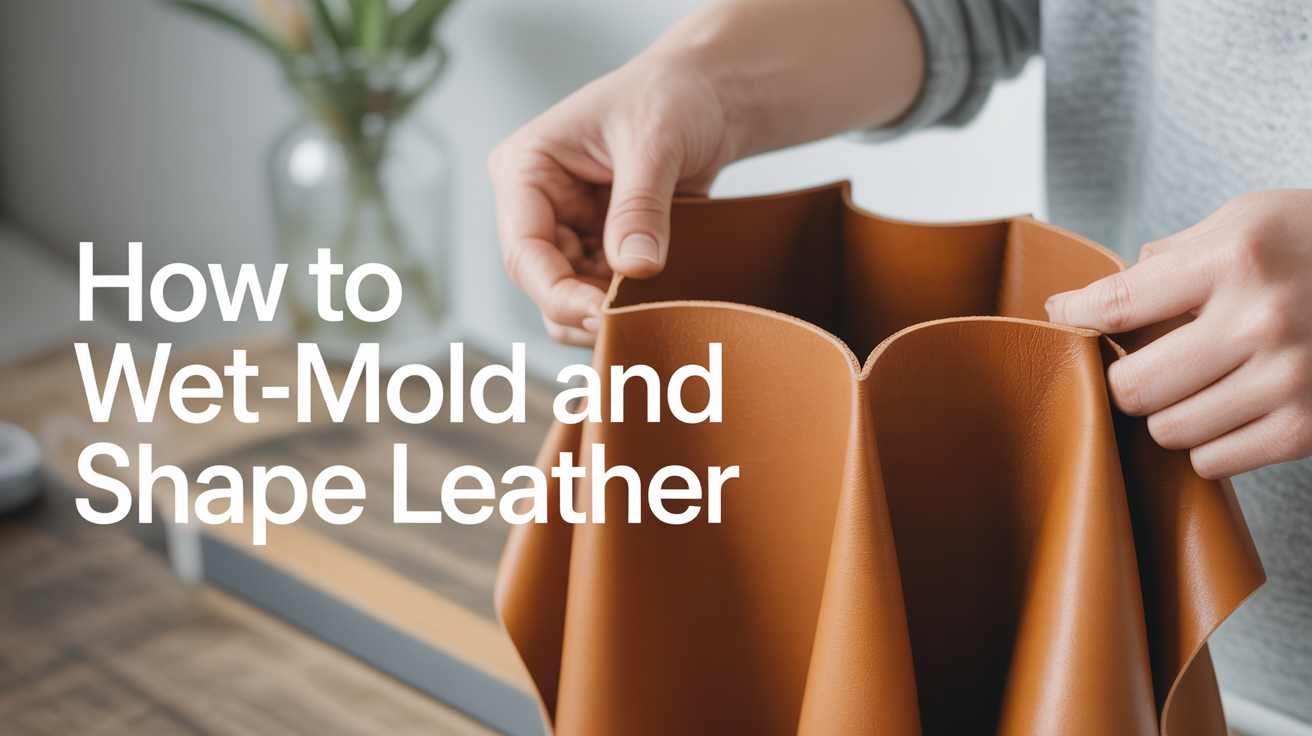
Wet molding leather is one of the craft's most satisfying techniques. You soak vegetable-tanned leather in water, press or stretch it over a form, and as it dries it holds that shape permanently. The result can be a curved knife sheath, a fitted coin purse, a structured eyeglass case, or any shape you need that flat leather cannot provide.
The short answer to "how to wet mold leather" is: wet the leather until it is pliable but not floppy, press it over or into a mold, secure it while it dries, then let it cure fully before removing. The details below will help you get a tight fit, avoid cracking, and pick the right leather for the job.
What Kind of Leather Works for Wet Molding
Not every hide can be wet molded. Vegetable-tanned leather is the one you want. The tannins in veg-tan leather react with water to become temporarily plastic, and as the hide dries, those fibers lock into their new position.
Chrome-tanned leather, which covers most garment hides and fashion accessories, does not mold well. It stays soft and relaxed after drying rather than holding a shape. If you try to wet mold a chrome-tan piece, you will end up with a limp, misshapen disappointment.
For thickness, 3 oz to 5 oz (roughly 1.2 mm to 2 mm) is a good range for smaller molded pieces like sheaths and card holders. Thicker stock, 7 oz and above, requires longer soaking and more force to conform around tight curves but produces stiffer, more rigid results once dry. Start on the thinner side while learning.
Practice on a piece of scrap before cutting your final blank. Veg-tan leather is not expensive compared to your time, and a test run reveals any surprises in how your specific hide behaves.
Preparing Your Mold
Your mold can be almost anything that holds its shape: carved wood, dense foam, a length of pipe, a glass bottle, a 3D-printed form, or even a wadded-up plastic bag stuffed into a shape. The key requirements are that the mold will not collapse under pressure and that you can get the formed leather off it once dry.
For simple sheaths, many crafters carve a wooden positive that mimics the item being held. For curved pouches, a piece of carved balsa or pine works fine. If your mold has undercuts that would trap the leather, wrap it in a single layer of plastic wrap so the dried piece releases cleanly.
Avoid porous wood that absorbs too much moisture from the leather. If your wood mold is raw and thirsty, seal it with a coat of paste wax or polyurethane before use.
How to Wet the Leather
The goal is even saturation without over-soaking. Over-soaked leather can stretch unevenly, develop tide marks, or take much longer to dry.
There are two common approaches:
Dipping in water: Fill a basin with cool or room-temperature water and submerge the leather blank. Watch for bubbles rising from the hide. When the bubbling slows and stops, the piece is saturated. This typically takes 30 seconds to 3 minutes depending on thickness. Pull it out, hold it vertically for a moment to let excess water drip, then blot both sides lightly with a clean cloth.
Sponging: Wet the hide side (the back, rougher surface) with a damp sponge and let the moisture wick through to the grain side. This gives you more control but takes longer to achieve even saturation. Good for large pieces where you want to wet a specific zone.
The leather should feel cool and somewhat limp. If it feels stiff or dry in spots, it needs more water. If it is dripping and stretching under its own weight, give it a few minutes on a clean surface to relax before you start forming.
For more on getting leather ready to work, see how to wet case leather for tooling.
Forming the Leather Over Your Mold
Work quickly once the leather is wet. You have a working window of roughly 10 to 30 minutes before the surface starts to stiffen.
Place the wet blank over your mold and begin pressing from the center outward. Use your thumbs and palms to push the leather into curves and recesses. A bone folder or modeling spoon helps work tight corners without creating fingernail dents. For sheaths, a smooth wooden dowel can push the leather into narrow channels.
If you need the leather to wrap around the back of a mold, you can use binder clips, clothespins, rubber bands, or dedicated mold-clamping rigs to hold it while it dries. Even simple masking tape can hold a fold in place. The leather will not remember being taped; it will remember the shape it dried in.
For deeper forming, you can use a two-part mold: a positive form and a pressure plate or second carved piece that presses the leather from the other side. This is common for molded coin pouches and structured bags where you want crisp definition on both the front and back.
Drying and Curing
This step is where patience matters most. Let the piece dry naturally at room temperature. Do not use a heat gun, hair dryer, or direct sunlight to speed things up. Fast heat drying causes the leather to shrink unevenly and crack, especially at folds and edges.
Depending on your leather's thickness and your humidity level, full drying can take 12 to 48 hours. The piece should feel room temperature to the touch, not cool or damp, before you remove it from the mold.
Once dry, condition the leather with neatsfoot oil, leather balm, or a conditioner appropriate for veg-tan. Wet molding pulls out some of the hide's natural oils, and skipping this step can leave the finished piece brittle over time. Apply the conditioner sparingly with a cloth, let it absorb for an hour, then buff off any excess.
If you plan to tool or stamp the formed piece, do that before full drying while the leather is still at "case" moisture. Tooling on already-dry molded leather is possible but harder. See how to tool leather: a beginner's guide to stamping for timing guidance, and check beginner leather stamping tools and how to use them for tool selection.
Quick Reference: Wet Molding at a Glance
| Step | What to Do | Watch Out For |
|---|---|---|
| Choose leather | Vegetable-tanned only | Chrome-tan will not hold shape |
| Prepare mold | Seal raw wood; add plastic wrap for undercuts | Porous mold pulls moisture unevenly |
| Wet leather | Submerge until bubbles stop, or sponge to saturation | Over-soaking leads to stretching and tide marks |
| Form | Press from center outward; secure with clips | Work within 10-30 minutes before stiffening |
| Dry | Room temperature, 12-48 hours on the mold | Heat drying causes cracking and uneven shrinkage |
| Condition | Apply neatsfoot oil or leather balm after drying | Skipping leaves the piece brittle |
Frequently Asked Questions
Can I use tap water or does it need to be distilled? Tap water is fine for the vast majority of projects. Distilled water only matters if your tap water is very hard and you notice mineral deposits appearing on the surface as the leather dries. If you do see white residue after drying, switching to distilled water on your next project will solve it.
My leather cracked when I tried to mold it. What went wrong? Cracking usually means the hide was not wet enough before forming, dried too fast, or was chrome-tanned rather than veg-tanned. Double-check the leather type first. If it is veg-tan, try a longer soak time and keep it away from heat and direct airflow while it dries.
How long does the molded shape last? A properly dried and conditioned molded piece holds its shape indefinitely under normal use. Water can temporarily soften veg-tan leather, so avoid submerging a finished molded item. Surface moisture from rain or damp hands will not cause a problem, but soaking a finished piece for minutes at a time can loosen the form.
Can I re-wet and reshape a piece I already molded? Yes. If the piece has not been sealed with a heavy lacquer or film finish, you can re-wet it and mold it into a new shape. This is occasionally useful when a first attempt did not turn out how you hoped.
Do I need to finish or seal the outside after molding? Not strictly required, but recommended. A light coat of leather finish or wax helps the piece resist surface moisture and abrasion. For functional items like sheaths or holsters, a resolene or similar acrylic sealer adds durability. Always condition before sealing so the conditioner can penetrate.