How to Mark and Punch Even Stitching Holes
Learn how to punch stitching holes in leather with perfect spacing: marking the stitch line, using pricking irons, and handling corners cleanly.
Even stitching holes are the foundation of tidy hand-sewn leatherwork. Get the marking and punching right, and your saddle stitch will sit straight, pull evenly, and last for years.
Step 1: Mark a Consistent Stitch Line
Before you touch a pricking iron, you need a clear, straight line to work from. Without one, your holes drift and the finished seam looks uneven.
Wing dividers are the traditional choice. Set the gap between the points to 3–4 mm (roughly 1/8 in), place one leg against the edge of the leather, and drag the other along the surface. A light single pass scores a faint line parallel to the edge.
A stitching groover cuts a shallow channel into the surface instead of just marking it. The groove lets your thread sit recessed below the grain, which protects it from abrasion. Most groovers have an adjustable fence; set it at 3–4 mm from the edge and pull it toward you in one steady stroke. Press firmly enough to cut into the grain layer, but not so hard that you slice through the leather.
Which should you use? On thicker vegetable-tan pieces (wallets, belts, card holders), a groover is worth the extra protection. On thin or soft leathers like chrome-tan, where grooving can weaken the piece, a wing divider line works better. See our guide on pricking irons vs stitching chisels for more on how tool choice connects to leather type.
Tips for a Clean Line
- Always work grain-side up so you can see what you're scoring.
- Pull, don't push. Dragging the tool toward you gives more control.
- On curved pieces, go slowly and let the fence ride the edge naturally.
- If your leather was cut rough, clean up the edge first so the fence has something consistent to follow. Our beginner's guide to cutting leather cleanly walks through that step.
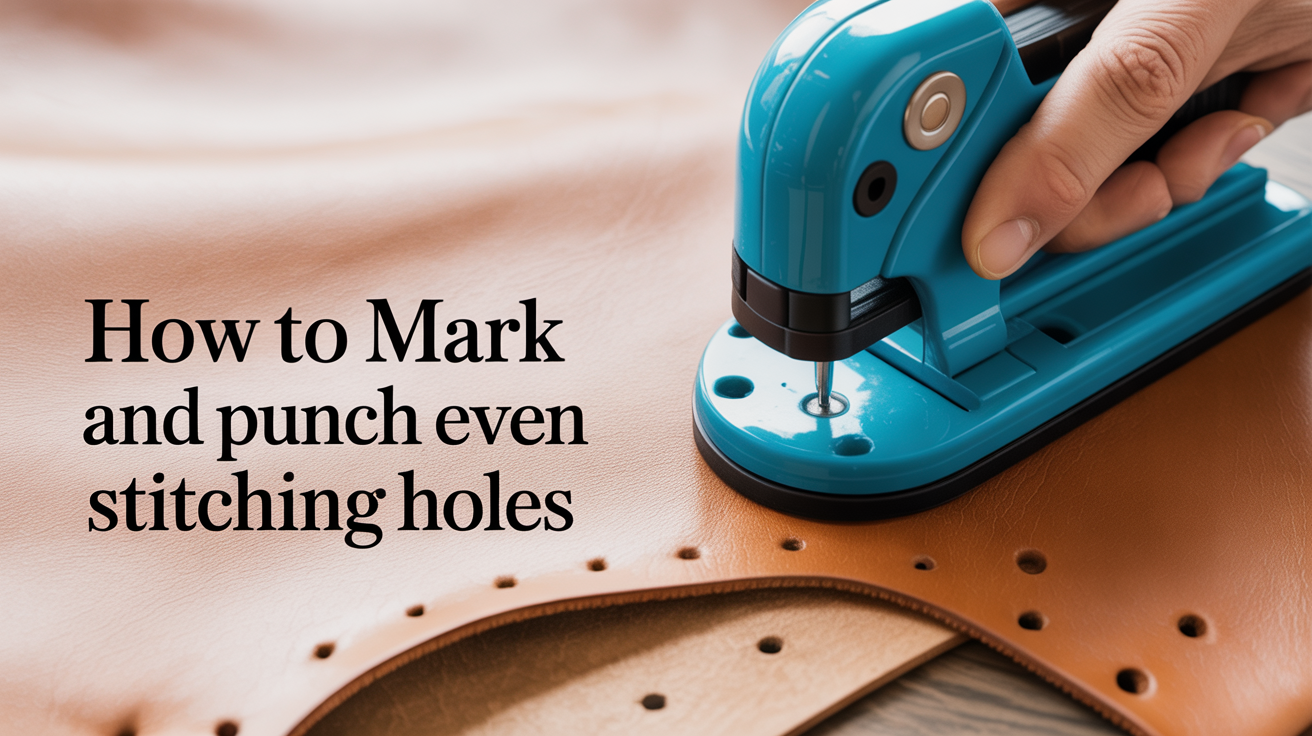
Step 2: Choose Your Punching Tool
Two tools dominate this step: pricking irons and stitching chisels. They look similar but produce different results.
A pricking iron has tines with a slight forward angle. When you drive it in and pull it out, it leaves angled entry points that guide your needle at a consistent slant, which is ideal for the saddle stitch where both needles cross inside the hole. A pricking iron marks holes but often doesn't punch all the way through; you finish each hole with a separate awl.
A stitching chisel (also called a stitching punch or diamond chisel) cuts clean diamond-shaped holes all the way through the leather in a single strike. Each tine is a tiny diamond blade. For most beginners, a four- or six-prong chisel is the everyday workhorse; a single-prong version handles curves and corners.
Common spacing sizes: 3 mm, 3.38 mm (which mimics traditional 8 stitches per inch), 4 mm. Tighter spacing looks fine on thin leather; wider spacing suits thicker pieces where the thread needs room.
Step 3: Punch the Straight Runs
Now comes the actual punching. Set up a poly cutting board or a firm rubber mat underneath your leather. You want a surface that lets the tines pass through cleanly without dulling them. Never punch on hardwood or a metal table.
Procedure for Straight Sections
- Place your chisel so the first tine sits at one end of your marked line, angled at 90° to the surface.
- Strike the handle firmly with a mallet (rawhide or nylon; avoid metal hammers). One clean strike is better than several light taps.
- Lift the chisel, then reposition it so the last tine drops into the last hole you just made. This shared-tine method keeps spacing consistent.
- Continue along the full stitch line, using the last hole as a registration point each time.
- Stop before you reach the end; leave the final spacing for planning (see Step 5).
Keep the chisel perfectly vertical. If you lean it, the holes angle differently from each other and your thread will look twisted from the back. A quick check: after punching a few holes, flip the piece over and confirm the exit points line up with the stitch line on the back.
Step 4: Handle Corners and Curves
Straight runs are forgiving. Corners and curves take a bit more thought.
Corners
At a corner, switch to your single-prong chisel. Mark a hole at the exact corner point first, then work outward in both directions to meet your straight-run holes. This gives you a clean anchor without crowding the tines.
If you try to use a multi-prong chisel around a tight corner, the outer tines end up spaced differently than the inner ones (the arc is smaller on the inside), and the spacing distorts. The single prong removes that problem entirely.
Curves
Along a curve, use the single-prong chisel for the entire arc. Punch one hole at a time, spacing by eye or using a pair of dividers to step off equal intervals before punching. Take your time here; rushing curves is where most uneven spacing happens.
A useful trick: score a very light pencil mark at each planned hole position before punching. You can erase pencil later, and it lets you see the whole spacing pattern before committing.
Step 5: Plan Your Hole Count So the Seam Ends Cleanly
Nothing looks worse than a seam that ends mid-stitch, with an orphaned hole at one end. Before you start a new piece, plan your hole count.
- Measure the stitch line length in millimeters.
- Divide by your chisel spacing to get an approximate hole count.
- Adjust the starting position slightly so the last hole falls close to the corner or end of the seam.
- You can also fudge the first hole slightly inward or outward. A millimeter or two is invisible once the thread is in.
For example: a stitch line of 100 mm with 4 mm spacing gives 25 holes. That works cleanly. If the line were 102 mm, you'd start the first hole 3 mm from the end instead of 4 mm, distributing the extra 2 mm invisibly across the seam.
It's also fine to deliberately land one hole spacing short of the end; finish the seam with a proper locking backstitch rather than a trailing partial hole.
Step 6: Check Angles and Finalize
Before threading a needle, do a quick quality check.
- Flip the piece. The exit holes on the flesh side should run in a straight line. Any stray holes indicate the chisel tilted during punching.
- Check the angle consistency. Hold the piece up to a light. All holes should slant at the same angle. Wildly inconsistent angles will show in the finished stitch.
- Enlarge if necessary. If a hole is slightly off-center or ragged, a gentle twist of the awl can correct it. Forcing an oversized awl will tear the leather, so go slowly.
Once you're satisfied, you're ready to thread up. See our complete guide to hand-stitching leather with the saddle stitch for the next step.
Common Pitfalls and How to Fix Them
| Problem | Likely Cause | Fix |
|---|---|---|
| Holes drift away from the edge | Fence pressure inconsistent while grooving | Re-groove at a fixed setting; practice on scrap |
| Spacing widens near corners | Using a multi-prong chisel around curves | Switch to single-prong for all curved sections |
| Holes angled inconsistently | Chisel tilted during punching | Hold chisel with both hands; use a mirror or phone camera to check vertical |
| Seam ends on an odd half-space | No hole count planned in advance | Measure and calculate before punching first hole |
| Ragged hole edges | Dull tines | Strop the tines on a leather scrap with honing compound |
FAQ
What is the difference between a stitching groover and a wing divider for marking stitch lines?
A wing divider scores a faint surface line without removing material; it marks where to punch. A stitching groover cuts a recessed channel into the grain layer, which hides the thread below the surface and protects it from wear. Use a groover on thick, firm vegetable-tan leather; use a divider on thin or delicate hides where cutting a groove could weaken the piece.
How far from the edge should I set my stitch line?
3–4 mm (about 1/8 in) is the standard range for most leathercraft projects. Thicker leather can handle 4–5 mm; very thin leather (under 1 mm) often works best at 2.5–3 mm. The goal is enough material between the hole and the edge that the thread won't pull through under tension, but close enough that the seam looks intentional.
Can I punch stitching holes without a mallet, just by hand pressure?
On very thin leather (1 mm or less), some stitching chisels can be pressed through by hand. On anything thicker, hand pressure is rarely sufficient and will produce inconsistent depth. A rawhide or nylon mallet delivers a controlled, repeatable strike without damaging the tool handle, and it's worth having one.
How do I keep holes vertical instead of angled?
Grip the chisel near the top with your dominant hand and stabilize the lower portion with your off hand. Stand directly over the work so you're looking straight down at the tines. A short piece of masking tape on the handle as a visual vertical guide can help beginners. If your workspace allows it, propping a small mirror behind the chisel lets you see the angle from the side while you strike.
My holes are uneven near the end of the seam. What went wrong?
This usually means the final holes were punched without planning the spacing. Use the last tine of your chisel as a registration point on every strike, and stop two to three holes before the end to measure and adjust manually. Ending a seam cleanly often requires finishing the last few holes one at a time with a single-prong chisel, stepping off the spacing with dividers.