How to Hand Stitch Leather: The Saddle Stitch Explained
Learn how to saddle stitch leather step by step: the two-needle method, thread length, punching, and locking off for a stitch that outlasts a sewing machine.
The saddle stitch is the only hand stitch you really need for leather. Two needles, one length of thread, and a little patience produce seams that have been holding saddles, belts, and wallets together for centuries. They'll outlast anything a domestic sewing machine can produce.
Why the Saddle Stitch Is Stronger Than a Machine Lockstitch
A machine lockstitch loops the top and bottom threads around each other inside the material. When one thread breaks, the knot cascades and the seam unravels. The saddle stitch works differently: each needle passes through the same hole from opposite sides simultaneously, so every single stitch is an independent lock. Cut one thread, and the rest of the seam stays put.
That's why saddlers have used this technique on horse tack for hundreds of years. High-wear, high-stress environments demand it. For beginners, the good news is that it's not difficult. It just requires the right setup and a steady rhythm.
Tools and Materials You'll Need
Before you thread a needle, gather everything:
- Two blunt harness needles (size 002 or 004 is a good all-rounder for 1–2mm thread)
- Waxed linen or polyester thread (see our guide on what thread to use for hand stitching leather for weight recommendations)
- Wing divider or stitching groover to mark the stitch line
- Diamond stitching chisels or a stitching chisel set (for a comparison see pricking irons vs stitching chisels: what to buy first)
- Stitching clam or pony to hold the work (optional but very helpful)
- Beeswax block to condition the thread if it isn't pre-waxed
- Scissors or thread snips
- A piece of scrap leather for practice
Harness needles are blunt on purpose. They slip through pre-punched holes without splitting thread or snagging skin. Don't substitute sewing needles.
Step 1: Prepare the Leather
Good stitching starts with clean edges and a consistent stitch line. Rush this step and every hole after it will be uneven.
Mark and Groove the Stitch Line
Use a wing divider (also called a stitch groover or edge groover depending on the model) to scribe a line parallel to the edge of your leather. A distance of 3–4mm (⅛ in) from the edge is typical for wallets and small goods; 5–6mm (about ¼ in) suits belts and heavier pieces.
The groove does two things: it gives you a visual guide for punching, and it recesses the thread slightly below the surface so it's protected from abrasion.
Punch the Holes
Align your diamond chisel with the groove. Place the leading prong directly on your last mark, press straight down with firm, even pressure (a mallet works better than a hammer) and advance along the line. Consistent angle and depth matter more than speed.
For curved sections, punch two or three holes at a time and re-align rather than trying to span the whole curve at once.
On especially thick leather (3mm / ⅛ in or more), you may need to punch from one side and clear the hole from the other with a single awl, or use a thicker set of chisels. Always test on a matching scrap piece first.
Pair your leather pieces and punch through both layers at once if possible. This guarantees the holes align perfectly. Marking and punching each piece separately is how you get offset stitching lines.
See our guide on how to cut leather cleanly for tips on preparing straight, clean edges before you mark your stitch line.
Step 2: Cut and Thread Your Needles
The Thread Length Rule
Cut a single length of thread roughly four times the length of the seam, plus about 30cm (12 in) extra for threading and finishing. Err on the side of too long. Running out mid-seam means a visible join.
For a 15cm (6 in) seam, you'd cut approximately 90cm (36 in) of thread. For a 30cm (12 in) belt strap seam, cut around 150cm (60 in). You'll use both ends, so the full length goes through the work.
Thread the Needles: The Saddler's Lock
Thread one needle onto each end of the length. Don't just pass the thread through the eye and leave it. The thread will pull free at the worst moment. Use the saddler's loop instead:
- Pass about 8cm (3 in) of thread through the needle eye.
- Pierce the short tail with the needle tip, about 2cm (¾ in) from the end.
- Pull the long thread to slide the pierced tail up snug against the eye.
- The thread locks against itself. Tug firmly to confirm it won't slip.
Repeat on the other end with the second needle. Both needles are now locked in place.
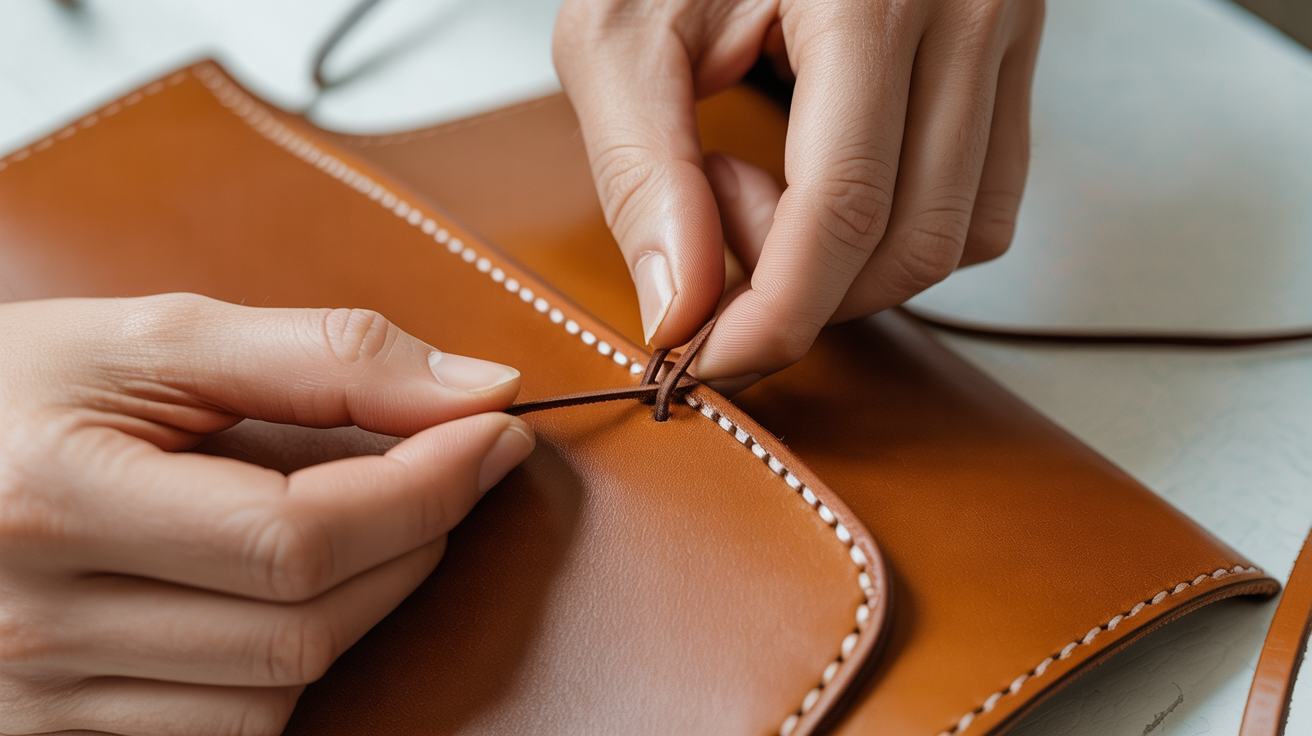
Step 3: Stitch
Hold the leather in a stitching clam at a comfortable height, or clamp it between your knees if you don't have one yet. Start from the end of the seam furthest from you and work toward your body.
The Two-Needle Over-Under Method
This is the core of the saddle stitch. Each stitch follows the same sequence:
- Push needle #1 (right hand) through the first hole, from front to back. Pull through until you have roughly equal thread on each side.
- Push needle #2 (left hand) through the same hole, from back to front. Pause before pulling through.
- Pass needle #1 over the top of needle #2's thread (not under it). This over-under order is critical. If you pass under instead of over, the stitch will twist and produce an uneven surface.
- Pull both needles through simultaneously, keeping equal tension on both threads.
- Advance to the next hole and repeat.
The stitch will show as a neat diagonal on the front face and an identical mirror image on the back. If one side looks right and the other looks twisted or crossed, you've swapped the over-under on some stitches. Start again on scrap before continuing.
Keeping Even Thread Tension
Pull both threads with the same force on every stitch. Too tight and the leather will pucker; too loose and the thread will sit proud of the surface and snag on things. Find a tension that makes the thread lie flat in its groove without distorting the leather, then maintain it consistently.
A useful trick: after seating each stitch, give a short, decisive tug on both threads at once. Same angle, same force every time. Your hands will learn the feel faster than your eyes can judge it.
Step 4: Lock Off the Seam
A saddle stitch doesn't need a knot at the end. The backstitch finish is cleaner and just as secure.
Backstitch and Burn (or Trim)
- At the last hole, pull both threads snug.
- Reverse direction and pass both needles back through the previous two or three holes, following the same over-under sequence in reverse.
- Pull tight after each backstitch.
- Bring both threads out through the same hole and trim close to the surface, within 1–2mm.
- If you're using polyester thread, touch a lighter briefly to the trimmed ends. The thread tip will melt into a small bead that anchors flush against the leather. Keep the flame moving and don't scorch the leather surface. Linen thread doesn't melt. For linen, simply trim flush and apply a small amount of beeswax rubbed into the knot.
Do the same backstitch at the starting end if you didn't lock off there before beginning.
Common Mistakes and How to Fix Them
Holes that don't align between layers. Punch both layers together, not separately.
Thread twisting mid-seam. If your thread is coiling or kinking, the spool may be adding twist as you work. Pull the thread off the spool and let the cut length hang freely for a moment to unwind before you thread the needle.
Needles colliding in the hole. This is normal on tight holes or thick thread. Angle one needle slightly off-center, push it through, then follow with the second. Forcing both straight-on can bend needles.
Uneven stitch length on curves. Slow down and re-check your chisel alignment after every two or three holes. Curves require shorter advances than straight lines.
Thread fraying from the needle eye. Run the thread once more across a beeswax block before threading. Wax consolidates the fibers and reduces friction through the holes.
FAQ
How long should my thread be for saddle stitching?
The standard rule is four times the seam length, plus about 30cm (12 in) extra. For a 20cm (8 in) seam, cut approximately 110cm (44 in). If you're stitching thicker leather or larger holes, lean toward the longer end. The thread doubles back on itself through each hole and uses up more length than you'd expect.
Do I need a stitching clam to saddle stitch?
Not strictly, but it helps a lot. Without a clam, you'll grip the leather between your knees or use a folded cloth, which is tiring and tends to let the piece shift. A basic stitching pony costs very little and keeps both hands free for the needles. If you're practicing on scrap, clamping the leather in a regular woodworking vise with leather-covered jaws also works.
Can I saddle stitch without pre-punching holes?
Technically you can pull through with a sharp awl as you go, but the results are rarely consistent for beginners. Pre-punched holes from a diamond chisel or pricking iron produce even spacing, cleaner entry angles, and a neater finished stitch. Pre-punch whenever you can.
What's the difference between pricking irons and stitching chisels?
Both punch holes, but they work differently. Pricking irons mark the holes without cutting all the way through; you follow up with an awl. Stitching chisels cut clean through in one strike. For most beginners, stitching chisels are more consistent and faster. The full comparison is in our guide on pricking irons vs stitching chisels: what to buy first.
Why does my saddle stitch look right on the front but twisted on the back?
The over-under order has flipped somewhere. The front face looks correct because the eye follows the top thread; the back twist reveals the inconsistency. Go back to scrap, work slowly through the over-under sequence, and stop after each stitch to look at both faces before continuing. Once the correct motion is in muscle memory, the error stops happening.