How to Make a Leather Valet Tray
Step-by-step guide to making a leather valet tray from scratch, cutting, molding, adding snaps, and finishing edges for a clean beginner project.
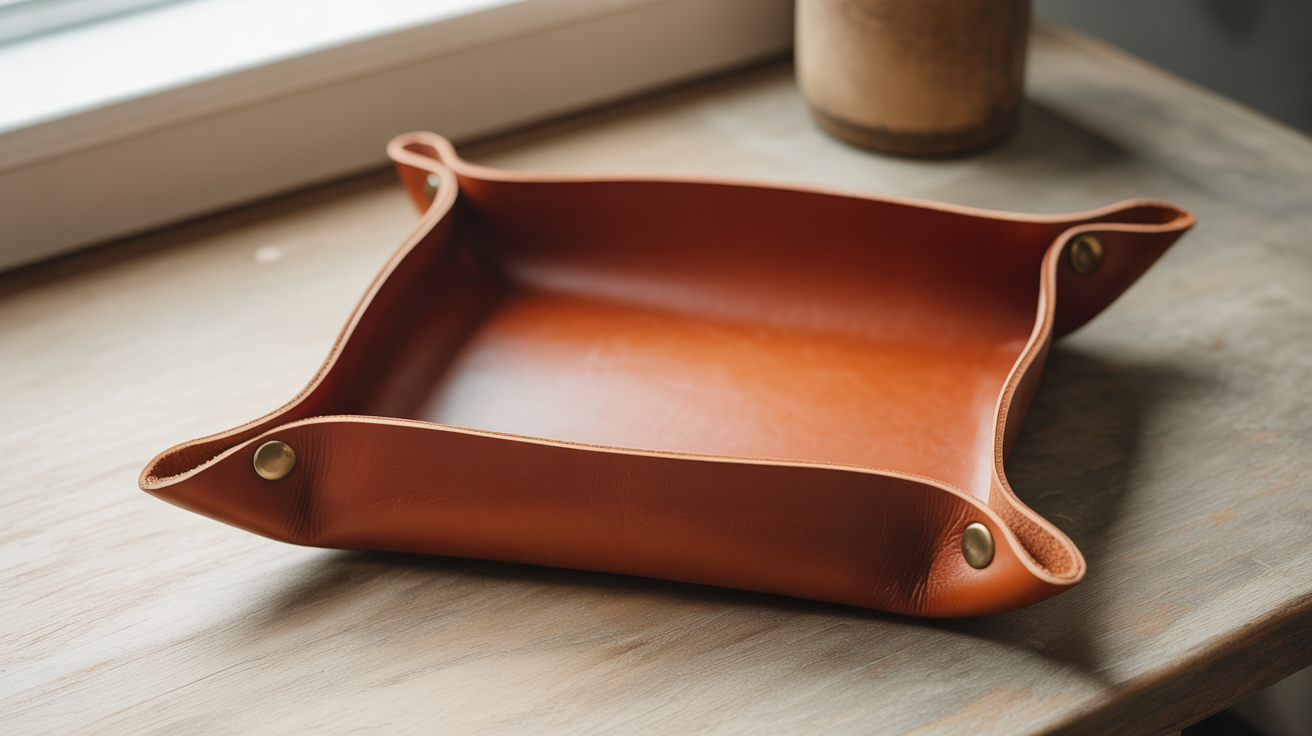
A leather valet tray is one of the most satisfying beginner projects you can make. It holds keys, coins, and a watch on a nightstand or desk, and the finished product actually looks like something you bought from a quality shop. The build takes an afternoon, uses only a handful of tools, and teaches you wet molding, a skill that unlocks a whole range of future projects.
Here is the short answer: cut a square or rectangle of veg-tan leather, wet it, press the corners into a form to create folded sides, let it dry fully, then secure those corners with snaps or stitching.
What You Need Before You Start
Leather
Vegetable-tanned leather is the only real option for wet molding. Chrome-tan does not hold a shape when it dries, it just relaxes back. Choose a side or piece that is 3 to 4 oz (roughly 1.2 to 1.6 mm thick) for a supple, flexible tray, or 5 to 6 oz if you want something stiffer that holds its form without a backing board.
A finished tray that is about 18 cm × 12 cm (7" × 5") needs a blank of roughly 25 cm × 19 cm (10" × 7.5") to account for the folded sides.
Tools and materials
| Item | Notes |
|---|---|
| Utility knife or head knife | Sharp blades only, a dull blade tears the leather |
| Metal straightedge or ruler | For clean straight cuts |
| Cutting mat | Protects your table and your blade |
| Wing divider or stitching groover | Marks the fold lines |
| Round punch or drive punch | For snap holes, 6 mm works for most line-20 snaps |
| Line-20 or line-24 snaps | Four sets (one per corner) |
| Snap setter + anvil | Or a snap-setting kit from any leather supplier |
| Skiver or sanding block | Thins the fold area if leather is stiff |
| Beeswax or toeCote | Edge finishing |
| Bowl of warm water or sponge | For wet molding |
| A form for shaping | A bowl, small box, or purpose-cut wooden block |
Cutting and Marking the Blank
Start on scrap. Seriously, practice the wet molding step on an offcut before you cut into good leather.
- Cut your blank to size. For a tray roughly 18 × 12 cm with 3.5 cm sides, your blank is 25 × 19 cm.
- Use a wing divider set to your side height (3 to 4 cm is a good starting point) to score fold lines parallel to each edge. These lines will be where the sides fold up.
- Mark the corners where the fold lines intersect. These are the cut points, you will make a diagonal cut at each corner to remove a small triangle so the sides fold without bunching.
The corner cut angle is usually 45 degrees, but do not obsess over this on your first tray. A slightly imperfect corner that you cover with a snap looks fine.
Wet Molding the Sides
This is the step that makes a leather catchall tray project feel like real craft.
- Dampen the leather evenly with a sponge or by dipping it briefly in warm water. The leather should darken and feel pliable but not soaking wet. Too much water and it may wrinkle or stretch unevenly; too little and the corners will crack.
- Work quickly while the leather is supple. Fold up each side along the scored lines and press them firmly against your form.
- If you are using a bowl as your mold, place the dampened leather inside and press the sides up against the bowl walls. If using a box or flat block, fold the sides up by hand and clamp or tape them in position.
- Hold each corner firmly and crease the fold line with a bone folder or the back of a spoon.
- Let the leather dry completely before you remove it from the form. This usually takes 2 to 4 hours at room temperature, or overnight to be safe. Do not use a heat gun to rush drying, you can crack the fibers.
Once dry, the tray will hold its shape on its own.
Securing the Corners with Snaps
Snaps are the fastest and cleanest way to secure a wet molded valet tray's corners. They also let you collapse the tray flat for storage or travel, which is a useful feature. This is what turns a shaped piece of leather into a proper leather tray with snaps.
- With the tray folded into position, mark where each corner overlaps.
- Use a drive punch to cut holes through both layers at the corner overlap. A 6 mm hole suits most line-20 snaps.
- Set the cap (top half) on the outside face and the socket (bottom half) on the inside layer. Use a snap setter and anvil, hitting firmly with a mallet. Test each snap before moving to the next corner.
An alternative to snaps is a running saddle stitch through the corner. This makes the tray permanent but adds a decorative element. If you want to learn that technique first, the guide on how to make a leather card holder beginner project walks through saddle stitching on a flat project before you add dimension.
Finishing the Edges
The inside surfaces of the tray see a lot of use, so edge finishing matters both for looks and for durability.
Bevel all four outer edges with an edge beveler before you wet mold, it is much easier to do on a flat piece. After the tray dries and the snaps are set, go back and burnish the top edges of the sides. Apply beeswax or a commercial edge finish and rub back and forth with a wooden slicker or a piece of canvas until the edge feels smooth and glossy.
If you dye the tray, do it before wet molding. Alcohol-based dyes penetrate better into dry, flat leather. Apply in thin coats with a dauber or sponge, let each coat dry, then buff lightly before the next. A finish coat of resolene or neatsfoot oil over the dyed surface gives the tray a slight sheen and protects the surface.
For the inside surface, a light application of leather conditioner after the tray dries keeps the veg-tan supple so the sides do not crack at the fold lines over time.
A Few Things That Go Wrong on a First Tray
Corners bunch up during molding. The corner triangle cut was too small or too shallow. Remove a slightly larger triangle on scrap next time, or make a small relief cut up from the corner point.
Leather cracked at the fold. Either the leather was too dry during molding or too thick for the bend radius. Dampen more thoroughly, or skive the fold line area down slightly with a skiver before molding.
Snaps feel loose. The holes are too large for the snap size, or the setter did not fully compress the rivet. Try the next snap size up, or replace the loose snap and set it again with a firmer strike.
Tray collapsed when dry. The leather is too thin for the side height. Either go thicker (5 to 6 oz), or glue a thin card liner to the inside of each side before the leather fully dries.
Once you have a tray you are happy with, the same wet-molding technique scales up to wallets, watch straps, and small bowls. A simple leather wallet made by hand uses flat construction but the same edge-finishing and snap-setting skills you practiced here.
Frequently Asked Questions
Can I use chrome-tan leather for a valet tray?
Chrome-tan does not retain a molded shape once it dries. It will relax back to flat. Stick with vegetable-tanned leather for any wet-molding project. If you already have chrome-tan on hand, you can make a tray using a permanent wood or acrylic liner glued to the inside to hold the corners up, but that is a different construction method entirely.
What thickness of leather works best?
For a soft, pliable tray that still holds its shape: 3 to 4 oz (1.2 to 1.6 mm). For a stiffer, more rigid tray: 5 to 6 oz (2 to 2.4 mm). Avoid going heavier than 6 oz unless you have a lot of experience with wet molding, since thick leather is harder to bend cleanly at the corners.
How many snaps do I need per tray?
Four, one per corner. Each snap is a two-part set: a cap and a socket. So you need four complete snap sets, which is eight total pieces. Line-20 snaps (also sold as size 20 or medium) are the most common and work well for trays.
Do I have to wet mold, or can I just fold and glue the corners?
You can glue the corners with contact cement without wet molding. The result is less refined because the leather will not have a crisp folded shape and may spring back slightly. Wet molding takes an extra hour of drying time but gives you cleaner sides and corners that actually hold. It is worth doing properly on your first tray.
Can I add a lining to the inside of the tray?
Yes, and it looks great. Suede or thin garment leather works well. Cut the liner to the interior dimensions of the finished tray, apply contact cement to both surfaces, and press down firmly. Trim any overhang with a sharp knife once the cement cures. A lining also covers the raw inside surface of the leather, which is especially useful if you skip dyeing the grain side.
If you want to work up to more ambitious accessories after finishing your tray, the process for making a leather belt from scratch covers cutting long straight lines and edge finishing on a larger piece, skills that transfer directly.