How to Make a Leather Notebook or Journal Cover
A step-by-step beginner guide to making a leather journal cover by hand, materials, pattern layout, cutting, stitching, and finishing.
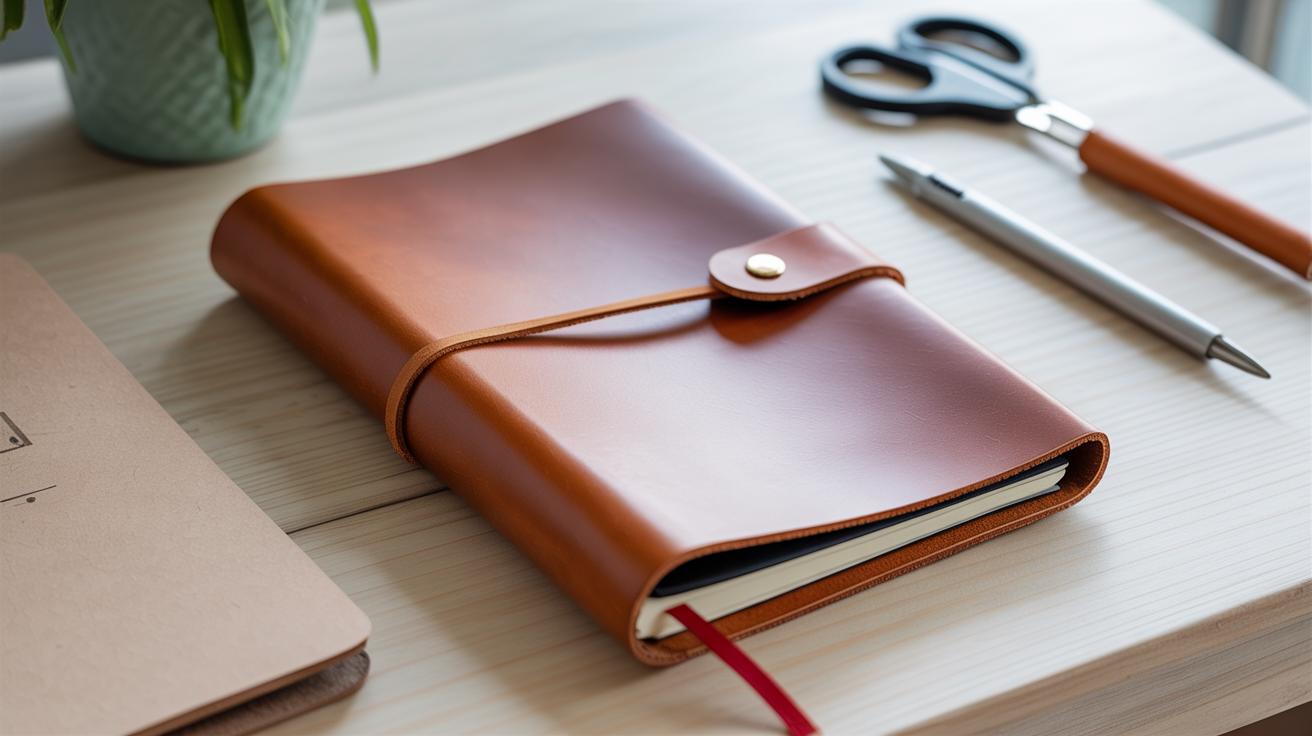
A leather journal cover is one of the most satisfying first projects in leathercraft. You get to use nearly every fundamental skill, measuring, cutting, hole-punching, saddle stitching, and edge finishing, and the finished piece is something you'll actually carry and use. This guide walks you through the whole process, start to finish, in plain language.
What You Need Before You Start
For a basic slip-in cover that fits an A5 notebook (the most common size for this project), you need a piece of vegetable-tanned leather roughly 3–3.5 mm thick. Veg-tan is ideal because it cuts cleanly, burnishes well, and ages with use. Chrome-tan leather is softer out of the bag but won't burnish the same way and can be slippery to stitch.
Tools:
- Swivel knife or straight edge for scoring cut lines (a metal ruler works fine)
- Sharp rotary cutter or head knife
- Cutting mat
- Wing divider or stitch groover set to 3–4 mm from the edge
- Stitching chisels or pricking irons (3–4 mm spacing is good for this thickness)
- Two blunt harness needles
- Waxed thread, 0.8–1 mm
- Edge beveler (size 1 or 2)
- Tokonole, beeswax, or gum tragacanth for burnishing
- Bone folder or wooden slicker
Materials:
- Vegetable-tanned leather panel, approximately 22 cm × 35 cm for an A5 cover
- Thinner leather (1–1.5 mm) for inner pocket flaps if you want them
- Optional: leather dye or oil finish
Test everything on scrap before you cut into your main piece.
Measuring and Cutting Your Pattern
An A5 notebook is 148 mm × 210 mm. A well-fitted slip-in cover needs a bit of room so the notebook slides in and out without force but doesn't flop around.
Basic outside cover dimensions:
- Height: notebook height + 10 mm (≈ 158 mm)
- Width: (notebook width × 2) + spine thickness + 30 mm for pocket flaps (≈ 330–340 mm total)
Adjust the width based on how thick your actual notebook is. A slim journal needs less spine allowance than a fat sketchbook. Measure your specific notebook with calipers or a ruler and plug in the real numbers.
For the inner pocket flaps (the sleeves the covers slide into):
- Height: same as the outer cover
- Width: 40–50 mm each
Cut these from thinner leather so the cover doesn't bulge when closed.
Mark all your cut lines with a silver pen or a scratch awl on the flesh (back) side, then cut along a metal ruler with a sharp rotary cutter. Take your time on corners, a wobbly corner is hard to fix after cutting.
| Piece | Approximate Size |
|---|---|
| Outer cover (A5) | 158 mm × 335 mm |
| Front inner flap | 158 mm × 45 mm |
| Back inner flap | 158 mm × 45 mm |
These numbers are starting points. Dry-fit your notebook before stitching anything.
Preparing the Edges and Stitch Line
Before stitching the pocket flaps to the outer cover, do your prep work, it's much harder to bevel and burnish once everything is assembled.
Top and bottom edges of the inner flaps: Bevel the flesh side of the long edge (the one that will face inward and be visible when the notebook is removed). Burnish with Tokonole on a wooden slicker until the edge is smooth. This edge won't be stitched so it needs to look finished on its own.
Outer cover edges: You'll finish these after assembly, but go ahead and bevel the four corners lightly now so they don't chip during handling.
Stitch line: Use a wing divider or stitch groover to mark a consistent line 3–4 mm from the edge along the sides and top/bottom where the flaps will attach. Running a groove (not just a mark) gives the thread somewhere to sit and protects it from wear.
Mark your stitching holes with pricking irons and a mallet. Work on a solid surface, a thick rubber mat or a piece of end-grain wood. Don't punch all the way through on a hard cutting mat or you'll blunt your irons fast.
Hand Stitching the Pocket Flaps
Position one inner flap on the front panel of the outer cover, flesh sides together, aligning the outer edges. Clamp or bulldog-clip them together. Repeat for the back flap.
Saddle stitch along the top edge, bottom edge, and outer side edge of each flap. Leave the inner edge open, that's where the notebook cover slides in. For a full guide on the saddle stitch technique itself, see how to make a leather card holder, beginner project, which covers the two-needle method in detail.
Stitch tension: Keep even tension on both needles. The thread should sit in the groove, not dig into the leather or float above it. If you're getting loops on one side, you're pulling one needle harder than the other.
Lock off your stitches by backstitching 2–3 holes and trimming the thread close. A lighter flame touched briefly to waxed thread will melt the end flush; don't hold it there or you'll scorch the leather.
Finishing the Edges
Once the flaps are stitched, trim any slight misalignment with a sharp knife and ruler. Then work around the entire perimeter of the outer cover:
- Bevel the grain-side edge with your edge beveler, one clean pass at 45 degrees
- Dampen the edge slightly with water on a fingertip
- Apply Tokonole or beeswax and rub with a wooden slicker in short, firm strokes until the fibers compress and the edge shines
The edge finishing step makes more visual difference than almost anything else. A burnished edge signals a well-made piece; a raw, frayed edge signals a rushed one. Take your time here.
If you're dyeing the leather, do it before the final edge burnish so the dye doesn't seal the edge fibers before you've worked them down.
For more on edge finishing options across different project types, how to make a simple leather wallet by hand covers edge paint as an alternative to burnishing for thinner pieces.
Conditioning and Final Fit Check
Before you slide the notebook in, condition the leather. Neatsfoot oil, Leather Honey, or a similar conditioner applied with a cloth will soften any stiffness from the finishing process and deepen the color slightly. Work it in on the grain side, wipe off the excess, and let it absorb for 30 minutes.
Then do a final fit check. The notebook covers should slide into the pockets with light resistance, snug enough to stay put, loose enough to remove without wrestling. If the pockets are too tight, you can carefully trim 2–3 mm from the inner edge of each flap. If they're too loose, there's not much to do structurally; a thin strip of double-sided tape on the back of the flap is a functional fix if the fit is really sloppy.
The cover will soften and conform to your notebook over the first few weeks of use. Leather that feels a touch stiff on day one usually feels broken in and comfortable by week two.
If you want to try a more complex project after this one, how to make a leather belt from scratch is a good next step, it introduces long straight cuts and different hardware.
Frequently Asked Questions
What thickness of leather works best for a journal cover? For a cover with structural body, 3–3.5 mm vegetable-tanned leather is a reliable choice. Thinner than 2.5 mm tends to feel floppy; thicker than 4 mm becomes hard to fold cleanly and the spine area may crack over time. The inner pocket flaps should be cut from thinner leather (1–1.5 mm) so the assembled cover doesn't stack up too thick.
Can I make a cover for a different size notebook? Yes, the pattern scales directly. Measure the height and width of your actual notebook, add 10 mm to the height for clearance, double the width and add the spine thickness plus enough for pocket flaps. A pocket depth of 40–50 mm works for most cover thicknesses. An A5 cover is a good size to start with because the panels are manageable and mistakes are less expensive than on a larger piece.
Do I need a stitch groover, or can I just mark a line? A stitch groover is not strictly required for a first project. A wing divider scribing a line at consistent depth is enough to guide your pricking iron. The groove does protect finished thread from wear, which matters more on items like belts or straps that take repeated abrasion. On a journal cover, a clean scribed line is a reasonable starting point.
How do I keep the spine from cracking when I open and close the notebook? Two things help. First, condition the spine area well before use so the fibers are supple. Second, make sure the spine width in your pattern matches the actual thickness of your notebook, a tight spine that has to stretch open will crack faster than one with a few millimeters of ease. For a notebook you'll use daily, slightly over-estimate the spine width rather than cutting it exact.
What thread should I use? Waxed polyester thread in 0.8–1 mm diameter is a practical choice for beginners. It's strong, doesn't rot, and is easier to tension consistently than linen. Linen is traditional and looks beautiful but requires more waxing and care during stitching to keep it from fraying. For a natural-looking finish on veg-tan leather, a tan or natural thread color tends to read as intentional; black thread on light leather can highlight any tension inconsistencies.