How to Burnish Leather Edges Until They Shine
Learn how to burnish leather edges step by step: sanding, beveling, slicking with gum tragacanth or Tokonole, and finishing with beeswax.
A burnished edge transforms a decent piece into one that looks like it was made to last a century. The process takes ten minutes once you know it: sand the edge flat, bevel the corners, apply a slicking compound, then rub fast until friction heat glasses the fibers. That's the whole thing.
What Burnishing Actually Does
Raw leather edges are rough. Cut the leather and you expose a cross-section of loosely packed fibers that catch on skin, absorb moisture, and fray over time. Burnishing compresses those fibers under heat and pressure until they fuse into a hard, glassy surface that resists wear and looks intentional.
The key word there is heat. Rubbing a dry piece of wood against a damp edge generates enough friction to melt the fibers slightly and bind them together. Without that heat, you get a temporarily smooth edge that soon fuzzes up again.
Which Leathers Burnish Well
Only vegetable-tanned leather burnishes properly. Veg-tan has a tight, dense fiber structure that responds to friction and moisture. Chrome-tanned leather (the soft, stretchy stuff used in most garments and handbags) has a looser fiber structure that won't compact the same way. If you're working with chrome-tan, use an edge paint or edge coat instead; trying to burnish it just makes a mess.
Combination-tanned and latigo leathers sit in the middle. They burnish with more effort than pure veg-tan, but the result is rarely as crisp. Test on a scrap first.
Tools and Supplies You'll Need
You don't need much to start:
- Sandpaper: 220–320 grit to shape, 400–600 grit to refine
- Edge beveler (size 1 or 2): a small curved blade that rounds off the sharp top and bottom corners
- Slicking compound: gum tragacanth, Tokonole, or plain water (more on the differences at /posts/gum-tragacanth-vs-tokonole-which-edge-slicker-to-use)
- Burnishing tool: a wood slicker with a groove (the groove cradles the edge), a cocobolo dowel, or a canvas cloth
- Optional: beeswax block for a final conditioning pass
A Dremel or rotary tool with a cloth wheel can speed things up on long runs, but hand tools are fine for learning and for shorter pieces.
Step-by-Step: How to Burnish Leather Edges
Work through these stages in order. Rushing any of them shows in the final surface.
Step 1: Cut a Clean Edge
Burnishing can't fix an uneven cut. Before anything else, check that the edge is straight and consistent. A metal ruler and a sharp skiver or utility knife work well. If the edge wobbles, trace it with a wing divider and trim to the line before moving on.
Step 2: Sand the Edge Flat
Fold a small piece of 220–320 grit sandpaper and rub it firmly along the cut edge, keeping the sandpaper perpendicular to the leather face. You're flattening any ridges left by the knife and removing loose fibers. Work the full length of the edge with even pressure.
Switch to 400–600 grit and repeat. At this stage the edge should feel smooth under your fingernail, with no fuzzy texture.
Step 3: Bevel Both Corners
Run your edge beveler along the top face of the leather at a consistent 45° angle. Then flip the piece and bevel the bottom. You're removing the sharp right-angle corners, which would otherwise split or curl as the edge dries. A single clean pass on each side is enough; over-beveling rounds the edge too aggressively and makes the final burnish look soft.
Follow up with a light pass of 400 grit sandpaper over the freshly beveled corners to knock off any small fibers the blade lifted.
Step 4: Apply Your Slicking Compound
Dip a finger or a small brush into your compound and apply a thin, even coat to the edge. You want the surface damp, not soaking. Too much compound and you'll get a sticky, muddy surface; too little and there isn't enough moisture to help the fibers move.
- Water alone works for a quick first pass, especially on thicker veg-tan. It dries fast, so work one section at a time (about 10–15 cm / 4–6 in).
- Gum tragacanth stays wet longer, gives a slightly harder finished surface, and works well on thinner leathers.
- Tokonole is the most user-friendly of the three: thick, slow to dry, and it burnishes to a high gloss with less effort.
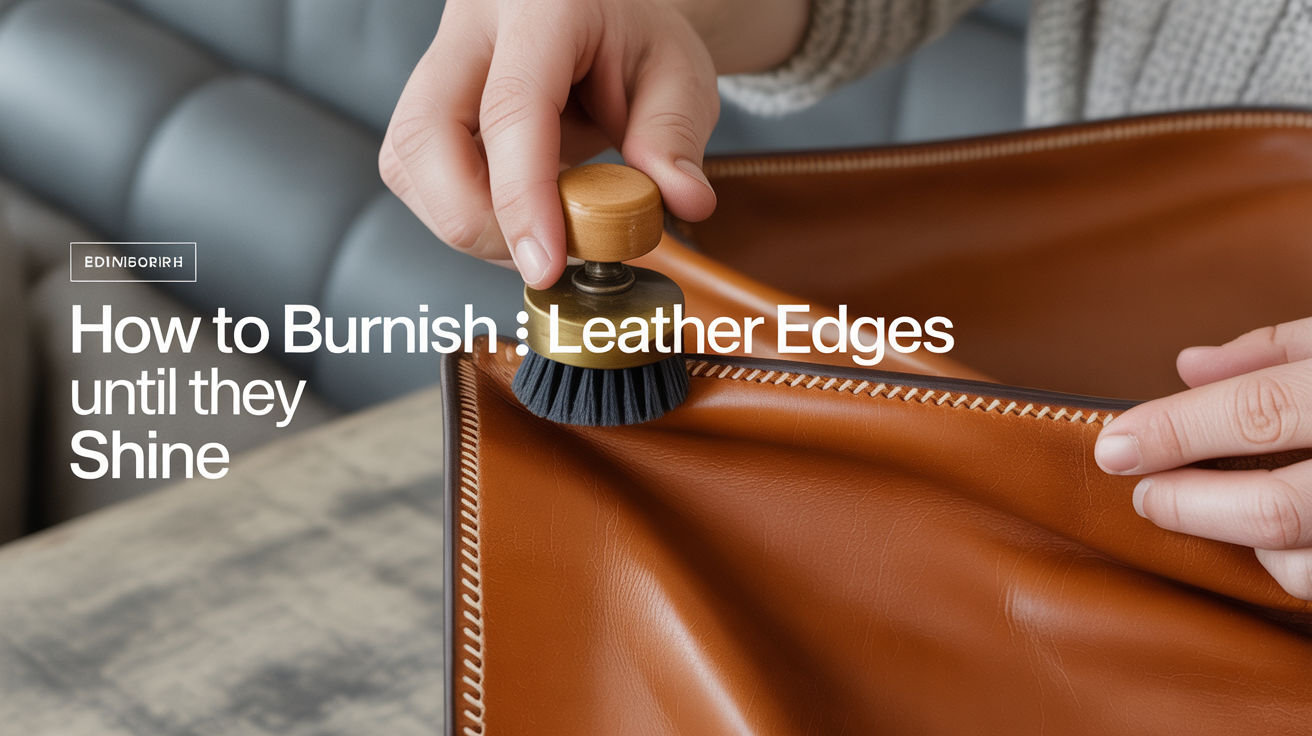
Step 5: Burnish with Friction
Place the grooved channel of your wood slicker over the edge and rub back and forth briskly. Not slowly and firmly, but fast. Speed is what generates the friction heat. You should feel the wood getting warm against the leather within 15–20 seconds.
Keep going. The fibers will start to compact and the surface will shift from matte to slightly translucent. For most veg-tan in the 1.5–3 mm (1/16–1/8 in) range, 30–60 seconds of sustained rubbing per section is enough for a first pass.
If you don't have a grooved slicker, a smooth piece of hardwood dowel (cocobolo is popular for its density) or even a folded piece of canvas works. The principle is the same: fast friction, consistent pressure.
Step 6: Repeat the Compound-and-Burnish Cycle
One pass rarely gets you to a glass-smooth edge. Let the first pass dry for a minute, apply another thin coat of compound, and burnish again. Three passes is the standard for a crisp edge. After the second pass, switch from a back-and-forth motion to small tight circles at the corners where the bevel meets the flat face.
Between passes, run your fingernail lightly along the edge. If you can feel a slight roughness or texture, it needs another round. A properly burnished edge feels like polished bone.
Step 7: Optional Beeswax Finish
After the final burnishing pass, rub a block of beeswax directly onto the edge and apply one more quick burnish. The wax fills any remaining micro-pores, adds a faint sheen, and gives some water resistance. It also keeps the edge from drying out and cracking in low humidity.
This step isn't required, but it's fast and the results last noticeably longer. Worth building into your routine.
Troubleshooting Common Problems
The edge is fuzzing up again after it dries
Usually means not enough passes, or the compound was too wet and didn't generate proper heat. Let it dry fully, sand lightly with 400 grit, and repeat the burnish cycle.
The edge looks dark and muddy
Too much compound (especially Tokonole) applied over an edge that had already been dyed. Dye your edges before burnishing whenever possible, or apply compound very sparingly and work quickly.
The beveler is tearing the leather instead of cutting cleanly
The blade is dull. Edge bevelers are inexpensive and the blades should be stropped regularly. A sharp beveler cuts quietly with almost no resistance; a dull one drags and tears the top grain.
One section won't gloss up like the rest
Usually a spot where the grain is slightly looser, the cut was less clean, or the leather absorbed more moisture. Sand that section, let it dry completely, and do an extra burnishing pass on just that area before the final full-length pass.
How Burnishing Fits Into the Wider Finishing Process
Edge burnishing is one step in a finishing sequence, not an isolated technique. If you're dyeing the piece, complete the dyeing first. Burnishing after getting an even leather dye job seals the dyed edge fibers and helps lock in color. Conditioner and surface finishes go on the faces last, after the edges are done.
For pieces with internal layers (like a doubled-over belt or a stitched wallet panel), glue the layers together and clamp them flat before sanding. The layers should be flush before you ever pick up the sandpaper.
FAQ
Can I use a Dremel or power tool to burnish leather edges?
Yes. A rotary tool with a felt or cloth burnishing wheel speeds up long runs considerably. Use low to medium speed and keep the tool moving — holding it still in one spot generates too much heat and can scorch the leather. Hand burnishing gives more control for corners and tight areas; power tools are best for long straight edges.
How do I burnish curved or rounded edges?
The technique is identical, but use a narrower groove on your slicker so it cradles the curve evenly. Work in shorter sections and keep the tool perpendicular to the edge face. For tight inside curves, a small dowel or even a smooth pen barrel works better than a large slicker.
What grit sandpaper should I use for leather edges?
Start at 220–320 grit to level the edge after cutting, then move to 400–600 grit before burnishing. Some makers follow with 800 or 1000 grit after the first burnishing pass for an exceptionally fine surface, but this is optional for most projects.
Does burnishing work on edges that have already been stitched?
Yes, as long as the stitch line sits far enough from the edge that the burnishing tool won't snag thread. Most saddle-stitch lines are 3–4 mm (1/8 in) from the edge, which leaves enough clearance. Work carefully and keep the groove of your slicker below the stitch holes.
My slicker isn't getting hot enough. What's wrong?
The most common cause is moving too slowly. Burnishing works through friction heat, which requires speed, not pressure. Try short, very fast strokes rather than long slow ones. A wood slicker with a tight groove also transfers heat more efficiently than a loose-fitting tool. If the edge still won't gloss, check that the leather is veg-tan — chrome-tan simply won't respond the same way.